



How to Train with a Power Meter: The Comprehensive 2026 Guide
Training by heart rate alone is often like driving a car with a speedometer that lags thirty seconds behind the accelerator. It’s a common frustration for many cyclists who find their numbers fluctuating based on stress, sleep, or even an extra morning coffee rather than their actual physical output. You might feel overwhelmed by the sheer volume of data or confused by metrics like TSS and NP, particularly when trying to maintain a steady effort on the undulating terrain we face here in Ireland.
We understand that data should be a tool for progress, not a source of confusion. This guide explains exactly how to train with a power meter to strip away the guesswork and transform your cycling performance with objective, real-time feedback. You’ll learn how to establish accurate training zones, pace your longest rides with precision, and see measurable fitness improvements over the coming season. We’ll move beyond the jargon to provide a clear, methodical approach to mastering your metrics, whether you’re using Assioma pedals or a ThinkRider smart trainer. By the end of this guide, you’ll have the expertise to turn every pedal stroke into a purposeful step toward your personal best.
Key Takeaways
- Understand why measuring work in Watts provides a more objective and immediate data point than heart rate alone.
- Learn how to establish your Functional Threshold Power (FTP) to create personalised training zones that reflect your current fitness level.
- Master how to train with a power meter by configuring your bike computer to display smoothed data for better pacing on undulating terrain.
- Ensure year-round consistency by using a single power source, like Assioma pedals, for both outdoor rides and indoor training sessions.
- Use your unique power curve to identify specific athletic strengths and plan essential rest periods to avoid overtraining.
Understanding the Power Meter: Why Watts Trump Heart Rate
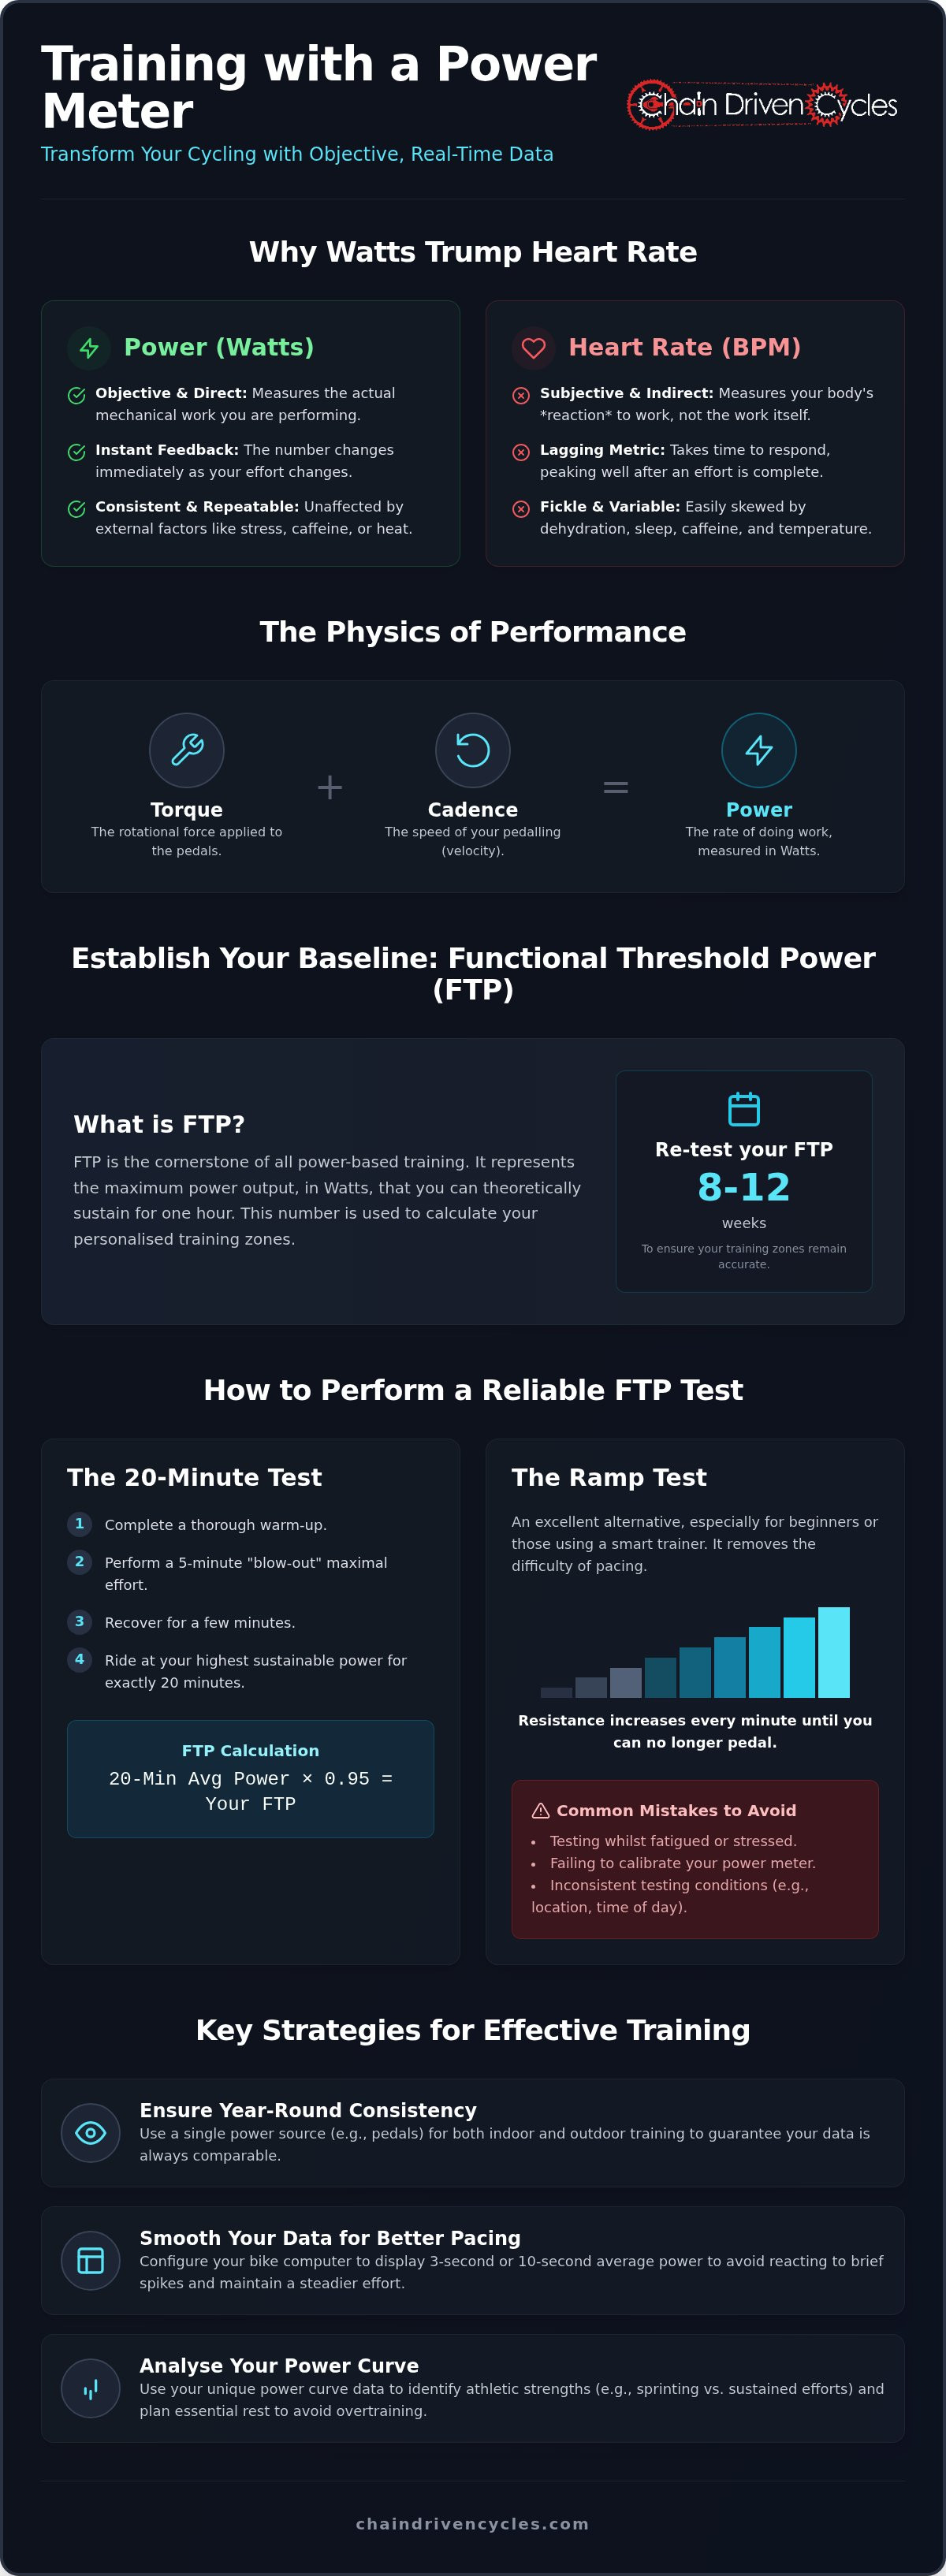
Heart rate has been the standard for monitoring effort for decades, but it's fundamentally flawed for high-precision training. A Cycling power meter measures the mechanical work you are doing in real time. While heart rate tells you how your body is reacting to the stress, power tells you exactly how much stress you're applying to the pedals. This distinction is vital when learning how to train with a power meter effectively.
The Physics of Performance: Force and Velocity
Inside your power meter, microscopic components called strain gauges measure the tiny amount of flex in your pedals or crank arms. This flex represents torque, or force. The device then combines this with your cadence, or velocity, to calculate power. The formula is simple: Power = Torque x Cadence. This means you can produce 300 Watts by pushing a heavy gear slowly or by spinning a lighter gear quickly. Improving either your force or your leg speed results in higher wattage. Understanding this relationship helps you refine your pedalling technique and overall efficiency on the road.
The Benefits of Investing in High-End Components
Precision is the foundation of any structured training plan. High-end high-end cycling components often boast accuracy margins of +/- 1%. This might sound like a small detail, but when your training zones are based on specific percentages, a 5% error could mean you're training in the wrong zone entirely. Reliability is equally important. Premium systems are built to withstand the rigours of the Irish climate, from heavy rain to road salt. Investing in professional-grade hardware ensures that the data you collect during a wet January base mile is directly comparable to your peak performance in July. This consistency is exactly how to train with a power meter for sustained, seasonal growth.
Establishing Your Baseline: FTP and Training Zones
Functional Threshold Power (FTP) is the cornerstone of all power-based training. It acts as the anchor point for your entire season. Without an accurate FTP, you cannot calculate your training zones correctly, which makes it impossible to know if you're actually improving. Essentially, FTP is the maximum power you can theoretically sustain for one hour. Knowing this specific number is the first step in learning how to train with a power meter to achieve consistent, repeatable results.
Your fitness isn't static. It fluctuates based on your training load, recovery, and even the time of year. Because of this, you should aim to re-test your FTP every 8 to 12 weeks. This ensures your training data remains relevant and your zones reflect your current physical capabilities rather than where you were three months ago. If your zones are based on outdated figures, you risk either overtraining or failing to provide enough stimulus for growth.
How to Perform a Reliable FTP Test
Performing a test requires a clear head and a flat stretch of road or a reliable indoor setup. The classic 20-minute test is the industry standard. It begins with a thorough warm-up, followed by a five-minute "blow-out" effort to deplete your anaerobic energy stores. After a short recovery, you ride at the highest power you can sustain for exactly 20 minutes. To find your FTP, you take 95% of that 20-minute average wattage. This accounts for the fact that a 20-minute effort is slightly higher than what you could maintain for a full hour.
If you're new to maximal efforts, the Ramp Test is an excellent alternative. Using a ThinkRider smart trainer, the resistance increases every minute until you can no longer turn the pedals. It's a shorter, more intense protocol that removes the need for complex pacing. Many athletes find Training with Power much easier once they've conquered the psychological hurdle of this first assessment. Common mistakes include testing whilst fatigued or failing to calibrate your equipment beforehand, both of which can lead to inflated or inaccurate results.
Defining Your Seven Power Training Zones
Once you have your FTP, you can organise your training into seven distinct zones. These zones allow you to target specific physiological adaptations with precision.
- Zone 1 (Active Recovery): Under 55% of FTP. Used for easy spins to flush the legs.
- Zone 2 (Endurance): 56-75%. This is the foundation of your aerobic base.
- Zone 3 (Tempo): 76-90%. Faster rhythmic riding that improves aerobic capacity.
- Zone 4 (Threshold): 91-105%. This is where you work to increase your FTP.
- Zone 5 (VO2 Max): 106-120%. Short intervals designed to boost oxygen uptake.
- Zone 6 (Anaerobic Capacity): 121-150%. High-intensity bursts for attacking short climbs.
- Zone 7 (Neuromuscular Power): Maximal effort sprints and explosive power.
Mastering these zones is how to train with a power meter like a professional. If you're ready to start your journey, you can explore our range of performance cycling tech to find the right tools for your specific goals.
Executing the Ride: Using Real-Time Data to Organise Your Training
Once your zones are established, the next challenge is applying that data whilst you're actually in the saddle. If you look at your bike computer and see your wattage jumping from 150 to 300 every second, it's easy to feel frustrated. This volatility is normal. To make the data useful, you must configure your head unit to display "3-second average power" rather than instant power. This small change smooths out the fluctuations caused by minor changes in road surface or pedalling technique, providing a steady number you can actually follow. It's a fundamental part of how to train with a power meter without becoming distracted by "data noise".
Beyond the 3-second average, your screen should be organised to show your Lap Power and current Training Zone. On undulating Irish terrain, riders often over-torque on short kickers, inadvertently riding into Zone 6 when they should be in Zone 2. By watching your real-time wattage, you can keep your ego in check. You'll soon realise that backing off slightly on a climb allows you to maintain a much higher average speed over the full duration of the ride. This objective view of your behaviour allows you to ride more efficiently, saving your energy for when it truly matters.
Managing Pacing and the 'Fly and Die' Effect
The "Fly and Die" effect occurs when a rider starts too hard and fades dramatically in the final hour. Power data is the ultimate cure for this. By using your Intensity Factor (IF), you can gauge exactly how hard you're working relative to your FTP. For a long endurance ride, you might aim for an IF of 0.65 to 0.75. If you see this number creeping higher in the first thirty minutes, you know you're burning matches that you'll need later. This disciplined approach to pacing is how to train with a power meter to master technical climbs and long sportives without over-reaching.
Understanding Key Metrics: TSS, NP, and IF
Post-ride analysis often centres on three acronyms: TSS, NP, and IF. Normalised Power (NP) is perhaps the most important. Unlike simple average power, NP accounts for the metabolic cost of surges and hard efforts. A ride with lots of short, sharp climbs will have a much higher NP than a steady flat ride, even if the average power is the same. Training Stress Score (TSS) then calculates the total "load" of the session based on intensity and duration. It's essential to remember that a 100 TSS ride from a short, brutal interval session feels very different from a 100 TSS ride over four hours of easy spinning. Both contribute to your fitness, but they require different recovery strategies.
Indoor vs Outdoor: Maintaining Consistency All Year
Achieving consistency across different environments is a significant hurdle for many cyclists. You might find that holding 250 Watts on a breezy coastal road feels manageable, whilst the same figure on a static trainer feels like a maximal effort. This discrepancy often stems from differences in cooling, flywheel inertia, and the lack of natural bike movement indoors. Understanding these nuances is a key part of how to train with a power meter effectively throughout the year. To eliminate these variables, many professionals recommend using a single power source for every ride.
When you use different devices for indoor and outdoor sessions, you introduce multiple margins of error. Even if both devices are accurate to +/- 1%, they might sit at opposite ends of that spectrum, creating a noticeable gap in your data. By using the same set of power pedals on both your road bike and your indoor setup, you ensure that every Watt recorded is directly comparable. This level of data parity is essential for tracking your Chronic Training Load (CTL) accurately as you transition between the turbo and the road.
The Synergy of ThinkRider and Assioma Ecosystems
Using a ThinkRider smart trainer allows you to execute precise, ERG-mode intervals where the machine controls the resistance for you. This is perfect for high-intensity sessions where pacing is difficult to manage manually. However, to ensure your data remains identical when you head back outside, you can pair your trainer with Assioma power meter pedals. Most modern software allows the trainer to "follow" the power readings from the pedals. This ensures that a Zone 4 effort in your living room is exactly the same as a Zone 4 effort on a local climb, providing a seamless transition between environments.
Winter Base Training and Summer Peak Performance
The winter months are the ideal time to organise your indoor season and build a robust aerobic engine. Without the distractions of traffic or weather, you can focus entirely on your specific power targets. Once spring arrives, your outdoor power data becomes a tool for refining race-day or sportive strategy. You will know exactly what wattage you can sustain for a two-hour event because you have already done the work on the turbo. This year-round approach is how to train with a power meter for long-term athletic development. To help you invest in this performance technology, we offer a 10-month payment plan, allowing you to upgrade your hardware well before your next major training block begins.
If you are ready to synchronise your data across every ride, you can browse our full range of power meters and smart trainers to find the perfect fit for your goals.
Long-Term Growth: Planning Your Season and Managing Fatigue
Data collection is a long-term commitment that extends far beyond a single session. Once you have accumulated several months of files, you can begin to use your Power Curve to identify your unique phenotype as a rider. This curve plots your best power outputs across various durations, from a five-second sprint to a multi-hour endurance effort. By analysing this graph, you'll quickly see if you naturally lean towards being a punchy sprinter or a steady-state climber. Understanding these physiological leanings is a vital part of how to train with a power meter to maximise your natural talents whilst addressing your weaknesses.
Reviewing your seasonal data allows you to set realistic, data-driven goals for the following year. Instead of simply wishing to be "faster", you can aim to increase your five-minute power by a specific percentage or maintain a higher wattage on a favourite local segment. This methodical approach turns vague ambitions into a concrete training plan. It also provides the perspective needed to appreciate your progress, even during periods when your form feels stagnant. Seeing a clear upward trend in your year-on-year power profile is the ultimate motivation for any dedicated cyclist.
Tracking Your Power Profile and PRs
Your power profile is defined by key benchmarks: your 5-second, 1-minute, 5-minute, and 20-minute maximums. These "bests" act as a biological signature. A high 5-second peak suggests a talent for sprinting, whereas a strong 20-minute figure indicates a high aerobic threshold. You can use this information to tailor your training specifically for your target events. If you're preparing for a hilly sportive, you'll want to focus on your 5-minute and 20-minute outputs. Comparing your current power meter pedals Ireland data with previous seasons helps you verify that your training interventions are actually working.
When to Rest: Using Data to Prevent Overtraining
One of the most powerful features of power-based training is the ability to quantify fatigue before it becomes a problem. Most training software uses Chronic Training Load (CTL) to represent your fitness and Training Stress Balance (TSB) to measure your freshness. A negative TSB is normal during a hard training block, but if it stays deeply negative for weeks, you risk burnout. Learning how to train with a power meter means knowing when to stop. If your power numbers start to drop whilst your perceived exertion feels sky-high, you've moved from being "tired but fast" to being "over-reached".
This is the point where a scheduled rest week becomes non-negotiable. During this time, your body adapts to the stress you've applied, leading to the "supercompensation" that actually makes you stronger. It's also an excellent time to book in for professional bicycle repair services. Ensuring your drivetrain is clean and your components are properly torqued is essential for maintaining data accuracy. A skipping chain or a loose crank arm can introduce "noise" into your power readings, making it difficult to trust the numbers you've worked so hard to generate.
Elevating Your Cycling Performance with Precision Data
Transitioning from heart rate to power metrics is the most significant step a cyclist can take towards professional-level preparation. By establishing a clear FTP baseline and using real-time data to manage your intensity, you eliminate the guesswork that often leads to inconsistent results. Consistency remains the final piece of the puzzle. Maintaining identical data whether you are on a local climb or a smart trainer ensures your long-term growth is both measurable and sustainable.
Understanding how to train with a power meter provides you with the objective evidence needed to refine your strategy and reach your peak fitness. As an authorised retailer for Assioma and ThinkRider, we are here to support your journey with expert technical advice and national delivery across Ireland. You can upgrade your training with Assioma Power Pedals at Chain Driven Cycles today, with flexible 10-month payment plans available to help you invest in your performance technology. We look forward to seeing the measurable improvements you achieve as you master the fundamentals of power-based training.
Frequently Asked Questions
Do I need a power meter if I already use a heart rate monitor?
Whilst you can train effectively with heart rate, a power meter provides the objective data that heart rate lacks. Heart rate is a lagging indicator influenced by heat, stress, and fatigue, whereas power is an instant measure of your actual work. Combining both allows you to see how your body is responding to a specific load. This dual approach is a vital part of how to train with a power meter for maximum efficiency.
Which is better for a beginner: crank-based or pedal-based power meters?
Pedal-based power meters are generally the best choice for beginners because they are incredibly easy to install and move between different bicycles. Crank-based systems often require specific bottom bracket compatibility and professional installation. A system like the Assioma pedals allows you to swap your power source from a road bike to a home trainer in minutes, making it a far more versatile investment for those starting out.
How often should I calibrate my cycling power meter?
You should perform a "zero offset" calibration before every ride to ensure the highest level of accuracy. Most modern bike computers allow you to do this in seconds through the settings menu. It is particularly important to calibrate your device if there has been a significant change in temperature since your last ride or if you have recently moved your pedals to a different bike. This habit ensures your training data remains reliable.
Can I use the same power meter pedals on my road bike and indoor trainer?
Yes, using the same pedals on both setups is the most effective way to maintain data consistency throughout the year. It ensures that a 250-Watt interval on your ThinkRider smart trainer is identical to a 250-Watt effort on the road. This removes the margin of error between different measuring devices, making it much easier to track your overall training stress and fitness progression accurately across every session.
What is a good FTP for a club-level cyclist in Ireland?
A solid benchmark for a club-level cyclist in Ireland is a Functional Threshold Power (FTP) between 3.0 and 3.5 Watts per kilogram (W/kg). For a rider weighing 75kg, this equates to roughly 225 to 260 Watts. Whilst raw wattage is useful on flat roads, your W/kg ratio is the metric that truly matters when tackling the short, punchy climbs found across the Irish countryside and in local sportives.
Does a power meter help with weight loss or just performance?
A power meter is an exceptional tool for weight loss because it measures energy expenditure in kilojoules with high precision. Heart rate monitors often estimate calorie burn based on age and weight, which can be inaccurate. A power meter measures the actual mechanical work you perform. This allows you to track exactly how much energy you have used during a ride, making it much easier to manage your nutritional intake.
Is it worth buying a single-sided power meter or should I go dual-sided?
Single-sided meters are a cost-effective way to start learning how to train with a power meter and are sufficient for most structured plans. They measure the left leg and double the figure to estimate total power. However, dual-sided systems independently measure both legs. This is particularly useful for identifying pedalling imbalances or for riders recovering from injury who need to ensure both legs are contributing equally to the effort.
What happens if my power meter battery dies mid-ride?
If your battery dies, your bike computer will simply stop displaying power data, but you can still finish your ride using heart rate or perceived exertion. Your previous data from the ride will be saved. To prevent this, modern units like the Assioma pedals provide low-battery alerts on your head unit long before the battery actually expires. Most systems offer between 50 and 160 hours of riding time per charge.