



Derailleur Hanger Guide: Find and Fit the Right Part
Your derailleur hanger is the sacrificial fuse of your bicycle, engineered to snap so your expensive frame doesn't. It's a small part with a massive responsibility, yet finding a replacement often feels like searching for a needle in a haystack of aluminium. With hundreds of nearly identical derailleur hangers on the market, it’s easy to feel overwhelmed by the fear of choosing the wrong fit and causing further damage. We understand that nothing is more frustrating than a bike you can't ride whilst you wait for a part that might not even work.
You shouldn't have to guess when it comes to your bike's structural integrity or shifting precision. This guide will teach you how to confidently identify, select, and install the perfect part for your specific model. We’ll explore the technical differences between traditional designs and modern standards like the SRAM Universal Derailleur Hanger, which has a 25 Nm torque specification. By the end of this article, you’ll have the expertise to restore your gear changes to their factory best and the knowledge to prevent future breakages on the trail or road.
Key Takeaways
- Understand why the hanger acts as a sacrificial "mechanical fuse" to protect your frame and drivetrain from terminal damage.
- Discover the performance benefits of CNC-machined derailleur hangers over standard cast versions for crisper, more reliable shifting.
- Master the "Three-Point Check" to accurately identify your specific part amongst hundreds of nearly identical designs.
- Follow a professional step-by-step guide to installation, ensuring you have the right tools and torque values for a safe repair.
- Learn how to maintain the integrity of premium bikes from marques like Bottecchia and Wilier with the correct authorised components.
Understanding Derailleur Hangers: Your Bike’s Sacrificial Safety Feature
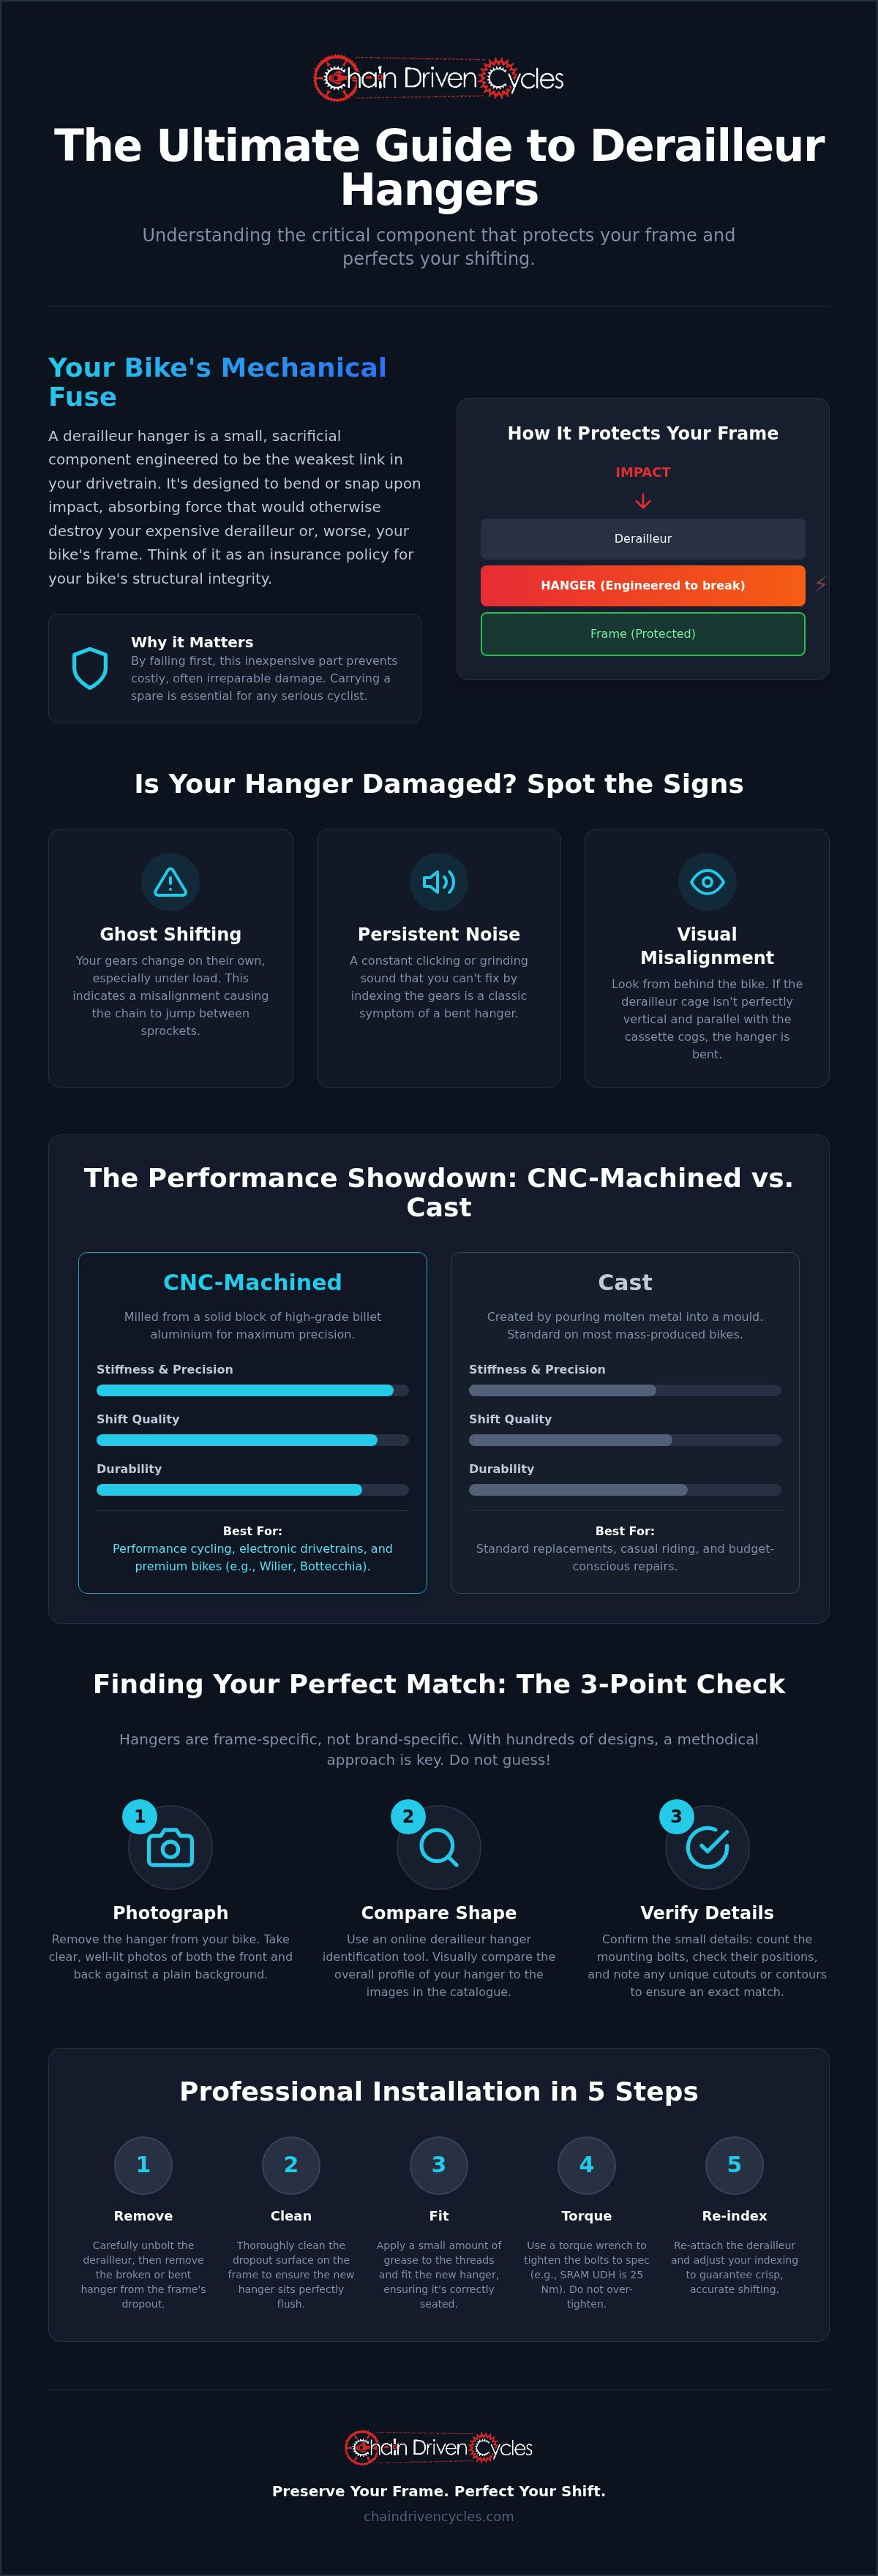
A derailleur hanger is often the smallest component on your bicycle, yet it performs one of the most critical roles in frame preservation. It functions as a mechanical fuse. By design, it is the weakest point in the drivetrain assembly, engineered to bend or snap under significant impact. This sacrificial behaviour ensures that the energy from a crash or a heavy knock is absorbed by the hanger rather than being transferred to the expensive Derailleur or, more importantly, the bicycle frame itself.
Common scenarios for failure include drive-side falls or the dreaded "chain suck", where the chain becomes jammed between the frame and the chainrings. In these moments, the hanger yields to prevent terminal damage. Because derailleur hangers are designed to fail to save your bike, carrying a spare is a non-negotiable rule for anyone embarking on long-distance tours or remote trail rides. Being stranded miles from home because of a five-minute repair is a frustration every cyclist should avoid.
Why One Size Does Not Fit All
Many riders mistakenly believe that hangers are determined by the brand of the derailleur. In reality, they are frame-specific. The design is dictated by the unique geometry of the frame's dropout and the specific axle type used, whether that is a traditional Quick Release or a modern Thru-Axle. Even within a single brand like Bottecchia or Wilier, different models and year groups will require distinct hangers. This specificity is why identifying the correct part requires a methodical approach rather than a lucky guess.
Signs Your Hanger is Bent (But Not Broken)
You don't always need a catastrophic snap to justify a replacement. A misaligned hanger is often the hidden culprit behind poor shifting performance. If you experience "ghost shifting" or a persistent clicking noise that indexing doesn't fix, your hanger is likely out of alignment. A bent hanger is dangerous. If it allows the derailleur to shift into the spokes, it can cause a total wheel lock-up and a dangerous crash. Whilst steel hangers can sometimes be straightened with an alignment tool, modern aluminium derailleur hangers are prone to work-hardening. Replacing the part is usually the most reliable way to restore crisp, professional-grade shifting.
CNC-Machined vs. Cast Hangers: Which Should You Choose?
The manufacturing process behind your hanger significantly dictates how your bike feels on the road. Most mass-produced bicycles come fitted with cast aluminium derailleur hangers. These are created by pouring molten metal into a mould, a method that is efficient but can lead to internal porosities and less structural consistency. In contrast, CNC-machined hangers are milled from a solid block of high-grade billet aluminium. This process ensures a much higher level of density and precision, which is essential for maintaining the tight tolerances required by modern drivetrains.
For owners of premium Italian bikes like Bottecchia, the choice of hanger is about more than just a quick fix. High-performance frames are designed for maximum power transfer and precision. A cast hanger, which may have slight dimensional variances, can compromise the entire system. Performance-oriented cyclists usually find that the increased cost of a CNC-machined part is justified by the reduction in maintenance and the improvement in shift quality.
The Performance Impact of Hanger Stiffness
Stiffness is the unsung hero of a smooth-running drivetrain. If a hanger is too flexible, it will deflect under the tension of the derailleur's spring or the force of a shift. This flex is the primary cause of sluggish gear changes and persistent drivetrain noise. It is especially problematic for electronic shifting systems, which rely on a perfectly rigid platform to execute lightning-fast movements. This level of rigidity is why CNC-machined components are the preferred choice for Wilier road bikes. Even as the industry moves towards standardisation with SRAM's Universal Derailleur Hanger (UDH), the material quality of the hanger itself continues to define the crispness of your gear changes.
Durability and Failure Points
There is an ongoing "bend versus snap" debate in the cycling community regarding CNC hangers. Some riders worry that a stiffer part won't break when it should, potentially risking the frame. However, engineers calibrate these premium parts to remain rigid during shifting whilst still acting as a fail-safe under impact. You can usually spot a high-quality hanger by its smooth finish and the absence of rough casting marks. Ensuring your hanger is straight and secure is a fundamental part of bike ownership. This is why professional electric and road bike servicing prioritises a hanger alignment check. If your current part shows signs of wear, you can explore our range of specialised hangers to find a durable, high-tolerance replacement.
The Visual Identification Guide: Finding Your Perfect Match
Finding the correct replacement amongst hundreds of nearly identical options is the most daunting part of the repair process. To simplify this, we recommend a methodical "Three-Point Check". This visual framework allows you to filter out the noise and focus on the technical details that define your frame's specific interface. If your hanger is in pieces, lay them out on a flat surface and take a high-resolution photograph. This visual record is invaluable when comparing your part against digital catalogues.
- Step 1: Inspect Mounting Holes. Count the number of screws that secure the hanger and observe their exact orientation. Are they positioned vertically, horizontally, or in a triangular pattern?
- Step 2: Examine the Dropout Shape. Look at the section where the axle sits. A traditional Quick Release slot looks very different from the threaded bore of a modern thru-axle system.
- Step 3: Check the Shoulder Profile. Inspect the "step" or shoulder that meets the frame. This part of the hanger must seat perfectly into the frame's recess to prevent any movement.
Front vs. Back: Mapping the Hanger Profile
A common mistake is only looking at the outward-facing side of the hanger. You must compare both the front and back profiles against product images. Pay close attention to whether the screw holes are recessed for a flush fit or if they sit on a flat mounting surface. Many derailleur hangers appear identical from one side but feature completely different internal machining. Spotting these subtle differences early prevents the frustration of ordering a part that looks right but won't seat properly against the frame.
Using Brand and Year as a Filter
Whilst visual checks are vital, using manufacturer data is the fastest way to narrow your search. Our specialised collection includes parts for leading marques such as Cannondale and Lapierre. When using these filters, the manufacturing year of your bike is the most critical piece of information. Brands often update dropout designs during a model's mid-cycle refresh. If you cannot find an exact visual match, don't force a "close enough" part. Instead, contact a specialist who can cross-reference your bike's serial number with known compatibility databases. As an authorised dealer for Bottecchia and Wilier, we can often source specific hangers that aren't listed in standard aftermarket catalogues.
Replacing Your Hanger: A Step-by-Step Installation Guide
Installing a new hanger is a straightforward task if you have the correct equipment. You'll need a set of metric Allen keys, a high-quality degreaser, and a precision torque wrench. Most derailleur hangers are secured by one or two small bolts that require very little force to seat. Before you begin the fitment, use the degreaser to thoroughly clean the frame's dropout area. This is the perfect time to inspect the frame for hairline cracks or structural stress, particularly if you're working with a high-performance carbon fibre road bike. A clean, smooth surface ensures the new part sits perfectly flush against the frame, which is vital for shifting accuracy.
Removing the Broken Component
Removing the remnants of a snapped hanger requires patience. Use a well-fitting Allen key to avoid rounding the small mounting bolts. If a bolt is stubborn, a drop of penetrating oil can help. When detaching the rear derailleur, support its weight. This ensures you don't kink the gear cable or damage the housing. Once the old components are off, wipe away any grit or old grease from the mounting interface. Applying a thin film of fresh grease to the contact points can prevent future corrosion and creaking noises.
When you're ready to fit the new part, focus on the torque settings. These small mounting bolts are easily stripped if over-tightened. For those using the modern standard, the torque specification for a SRAM Universal Derailleur Hanger (UDH) bolt is 25 Nm. Always use a torque wrench to reach the manufacturer's specified value. After the hanger is secure and the derailleur is reattached, you must perform a Limit Screw Check. This simple step ensures the derailleur cannot move too far inboard and strike the spokes, which would cause another catastrophic failure.
Fine-Tuning Your Shifting
Even a perfectly manufactured hanger might sit slightly differently from the one it replaced. You'll likely need to perform a minor indexing adjustment to get your gear changes crisp again. For the ultimate precision, professional mechanics use a hanger alignment tool to ensure the part is perfectly parallel to the cogs. If you find that your gears are still skipping after several attempts at indexing, it may be time to seek professional bike repair. Our team can verify the alignment and ensure your drivetrain is performing at its peak. To browse our full range of derailleur hangers, you can visit our online store.
Premium Hangers for Premium Bikes: Bottecchia, Wilier, and More
As authorised dealers for premier Italian marques, we understand that a high-performance machine requires components of equal calibre. Using generic derailleur hangers on a high-modulus carbon fibre frame is a risk that rarely pays off. Whilst a third-party part might look similar, even a fraction of a millimetre in variance can cause uneven stress on your frame's dropouts. This can lead to premature wear or, in worst-case scenarios, structural damage to the carbon itself. We prioritise stocking manufacturer-approved hardware to ensure your bike maintains its factory-intended precision and safety.
Our commitment to quality extends beyond the showroom. We provide national shipping and expert technical support to help you locate even the rarest dropouts. Whether you're riding a modern aero bike or a classic steel frame, having access to the correct technical data is essential. Our team uses their deep industry expertise to cross-reference your bike's specifications, ensuring the part you receive is a perfect match for your drivetrain.
Bottecchia and Wilier Specialist Hangers
The requirements for high-end racing machines are incredibly specific. When comparing Bottecchia vs Wilier bikes, you'll notice that each brand employs unique dropout geometries to achieve their signature ride characteristics. We stock authentic replacements for these machines to guarantee that your shifting remains as crisp as the day you bought the bike. Using manufacturer-approved hardware provides the peace of mind that your "mechanical fuse" will behave exactly as the engineers intended during an impact.
Finding Hangers for Cannondale and Lapierre
Major global brands like Cannondale and Lapierre have complex histories when it comes to hanger designs. Over the decades, these manufacturers have cycled through dozens of different standards. We've made it our mission to simplify this search. Our current inventory includes a specialised collection of over 40 derailleur hangers, covering everything from modern thru-axle disc brake frames to classic Quick Release models. We keep these essential parts in stock so you don't have to wait weeks for a specialist order to arrive from overseas.
If you're unsure which profile matches your frame, our visual identification guide and expert support team are here to help. Don't let a snapped part keep you off the road. Browse our full range of 44+ derailleur hangers and dropouts here to find the exact match for your bicycle and restore your performance today.
Restore Your Shifting and Protect Your Frame
Maintaining crisp, reliable gear changes is essential for any cyclist. By using the visual identification techniques and installation steps covered in this guide, you can confidently manage the most common failure point on a modern bicycle. Choosing high-quality derailleur hangers that match your frame’s specific geometry ensures that your "mechanical fuse" will perform its job without compromising shift quality. Precision matters. A well-fitted hanger is often the difference between a smooth ride and a costly repair bill.
As an authorised dealer for Bottecchia and Wilier, we provide the expert technical support you need to find the right part. We offer fast national delivery across Ireland, ensuring your downtime is kept to an absolute minimum. Our expertise ensures you receive a component that meets the exact tolerances of your machine, protecting your investment for the long term.
Shop the Full Collection of Derailleur Hangers and Dropouts and get back to enjoying the ride with total peace of mind. Your next adventure is just one repair away.
Frequently Asked Questions
How do I know which derailleur hanger fits my bike?
Visual identification is the most reliable method to ensure a perfect match. You should carefully inspect the number of mounting holes, the specific shape of the dropout, and the shoulder profile against your existing part. Because hangers are frame-specific rather than derailleur-specific, filter your search by the bike's manufacturer and the exact model year. If you're still uncertain, consulting an expert who can cross-reference your serial number is the safest approach.
Can I straighten a bent derailleur hanger or should I replace it?
You should usually replace a bent hanger rather than attempting to straighten it. Most modern hangers are made from cast or CNC-machined aluminium, which becomes brittle once it has been deformed. Straightening the metal can lead to work-hardening, making it prone to snapping unexpectedly during a shift. Whilst steel hangers on older bikes can sometimes be aligned with a specialist tool, a fresh replacement is the only way to guarantee crisp shifting and structural safety.
Why did my derailleur hanger snap for no apparent reason?
Hangers often fail due to cumulative fatigue or a specific mechanical event like "chain suck". Even if you haven't crashed, a slight knock during transit or a poorly adjusted limit screw can put constant stress on the aluminium. It's designed as a mechanical fuse, so it will eventually snap to prevent the energy of a drivetrain jam from destroying your frame. We stock over 40 types of derailleur hangers to cover these common failures.
Are all derailleur hangers the same for a specific bike brand?
No, hangers vary significantly even within a single brand's lineup. Manufacturers frequently update dropout designs for different models or during a mid-cycle refresh. For example, a Wilier road bike from several years ago may use a completely different component than a current disc-brake model. Always use the specific model name and manufacturing year as your primary filters. We keep a wide variety of derailleur hangers in stock to support these diverse frame requirements.
What tools do I need to replace a derailleur hanger at home?
You'll typically need a set of metric Allen keys, a degreaser, and a precision torque wrench. Most mounting bolts require a 2mm, 3mm, or 4mm hex key. Using a torque wrench is vital to avoid stripping the small, delicate threads on the frame or the part itself. If you're installing a SRAM Universal Derailleur Hanger, you'll specifically need a tool capable of reaching the 25 Nm torque specification to ensure the assembly is secure.
Is it safe to ride with a slightly bent derailleur hanger?
It isn't safe to ride with a misaligned hanger. Even a minor bend can cause the derailleur to over-shift into the spokes, leading to a total wheel lock-up and a dangerous crash. Beyond the safety risks, a bent hanger causes "ghost shifting" and excessive wear on your chain and cassette. If your gears are clicking or skipping despite correct indexing, stop riding and inspect the hanger immediately for any signs of physical misalignment or stress.
What is the difference between a derailleur hanger and a dropout?
The dropout is the part of the frame where the wheel's axle rests, whilst the hanger is the removable piece that connects the derailleur to that dropout. In modern bicycles, the hanger is a separate, sacrificial component designed to break under impact. On some older steel or titanium frames, the hanger and dropout are a single integrated piece. Understanding this distinction helps you communicate clearly with mechanics when you are seeking professional repair services or parts.
Should I carry a spare derailleur hanger whilst cycling?
Yes, carrying a spare is a non-negotiable rule for long-distance or remote rides. Because hangers are frame-specific, most local bike shops won't have your exact model in stock when you need it most. A spare takes up almost no room in a saddlebag and can be the difference between a five-minute roadside fix and a long, expensive walk home. It's an essential insurance policy for every serious cyclist to have in their kit.