



Bottles and Cages: The Complete Cycling Hydration Buying Guide 2026
Matching your bidon graphic to your bike's finish looks immaculate, but visual coordination won't stop your drink launching across the tarmac over a rough cattle grid. True retention relies on mechanical harmony; pairing cage geometry with precise bottle diameter is the only dependable way to prevent mid-ride ejections. If you've ever wrestled with cramped clearance on a compact road frame, endured stale plastic flavours during an endurance sportive, or winced as a loose cage marked your carbon tubes, you know that choosing the right bottles and cages involves far more than matching colours.
You shouldn't have to compromise between rock-solid bottle retention and effortless, one-handed access when riding at threshold. In this guide, you'll discover how to choose the ideal water bottles and bottle cages to keep your hydration secure, accessible, and aerodynamic on every ride. We explore retention profiles, lightweight carbon versus durable composites, professional workshop fitting standards, and side-entry solutions that keep your setup silent and dependable through thousands of training miles.
Key Takeaways
- Discover how matching retention tension across performance bottles and cages prevents dropped bidons without interrupting your cadence.
- Compare carbon fibre, composite, and metal builds to strike an optimal balance between low weight, frame protection, and trail durability.
- Identify when sloping geometry or compact triangles necessitate side-entry designs to ensure unhindered bottle extraction on the move.
- Learn how food-grade materials and self-sealing valves eliminate foul tastes whilst maintaining high-volume fluid delivery during intense efforts.
- Master professional workshop installation practices, including correct thread lubrication and torque limits, to protect your frame's threaded rivnuts.
Why Your Setup Demands Dedicated Cycling Bottles and Cages
A standard single-use drinks bottle might survive a gentle commute, but it quickly turns into a liability on open roads. Dedicated cycling hydration systems are engineered to secure shifting fluid payloads across fractured tarmac, cattle grids, and rapid descents. Thin disposable plastics buckle under mechanical tension, collapsing inward and slipping free when subjected to road vibration. High-performance bottles and cages maintain a reliable interface; they balance smooth, one-handed extraction during hard efforts with unyielding retention over rough surfaces. Quick fluid accessibility directly dictates your hydration cadence, sustaining endurance pacing without disrupting your line through the peloton.
The Hidden Hazards of Subpar Hydration Gear
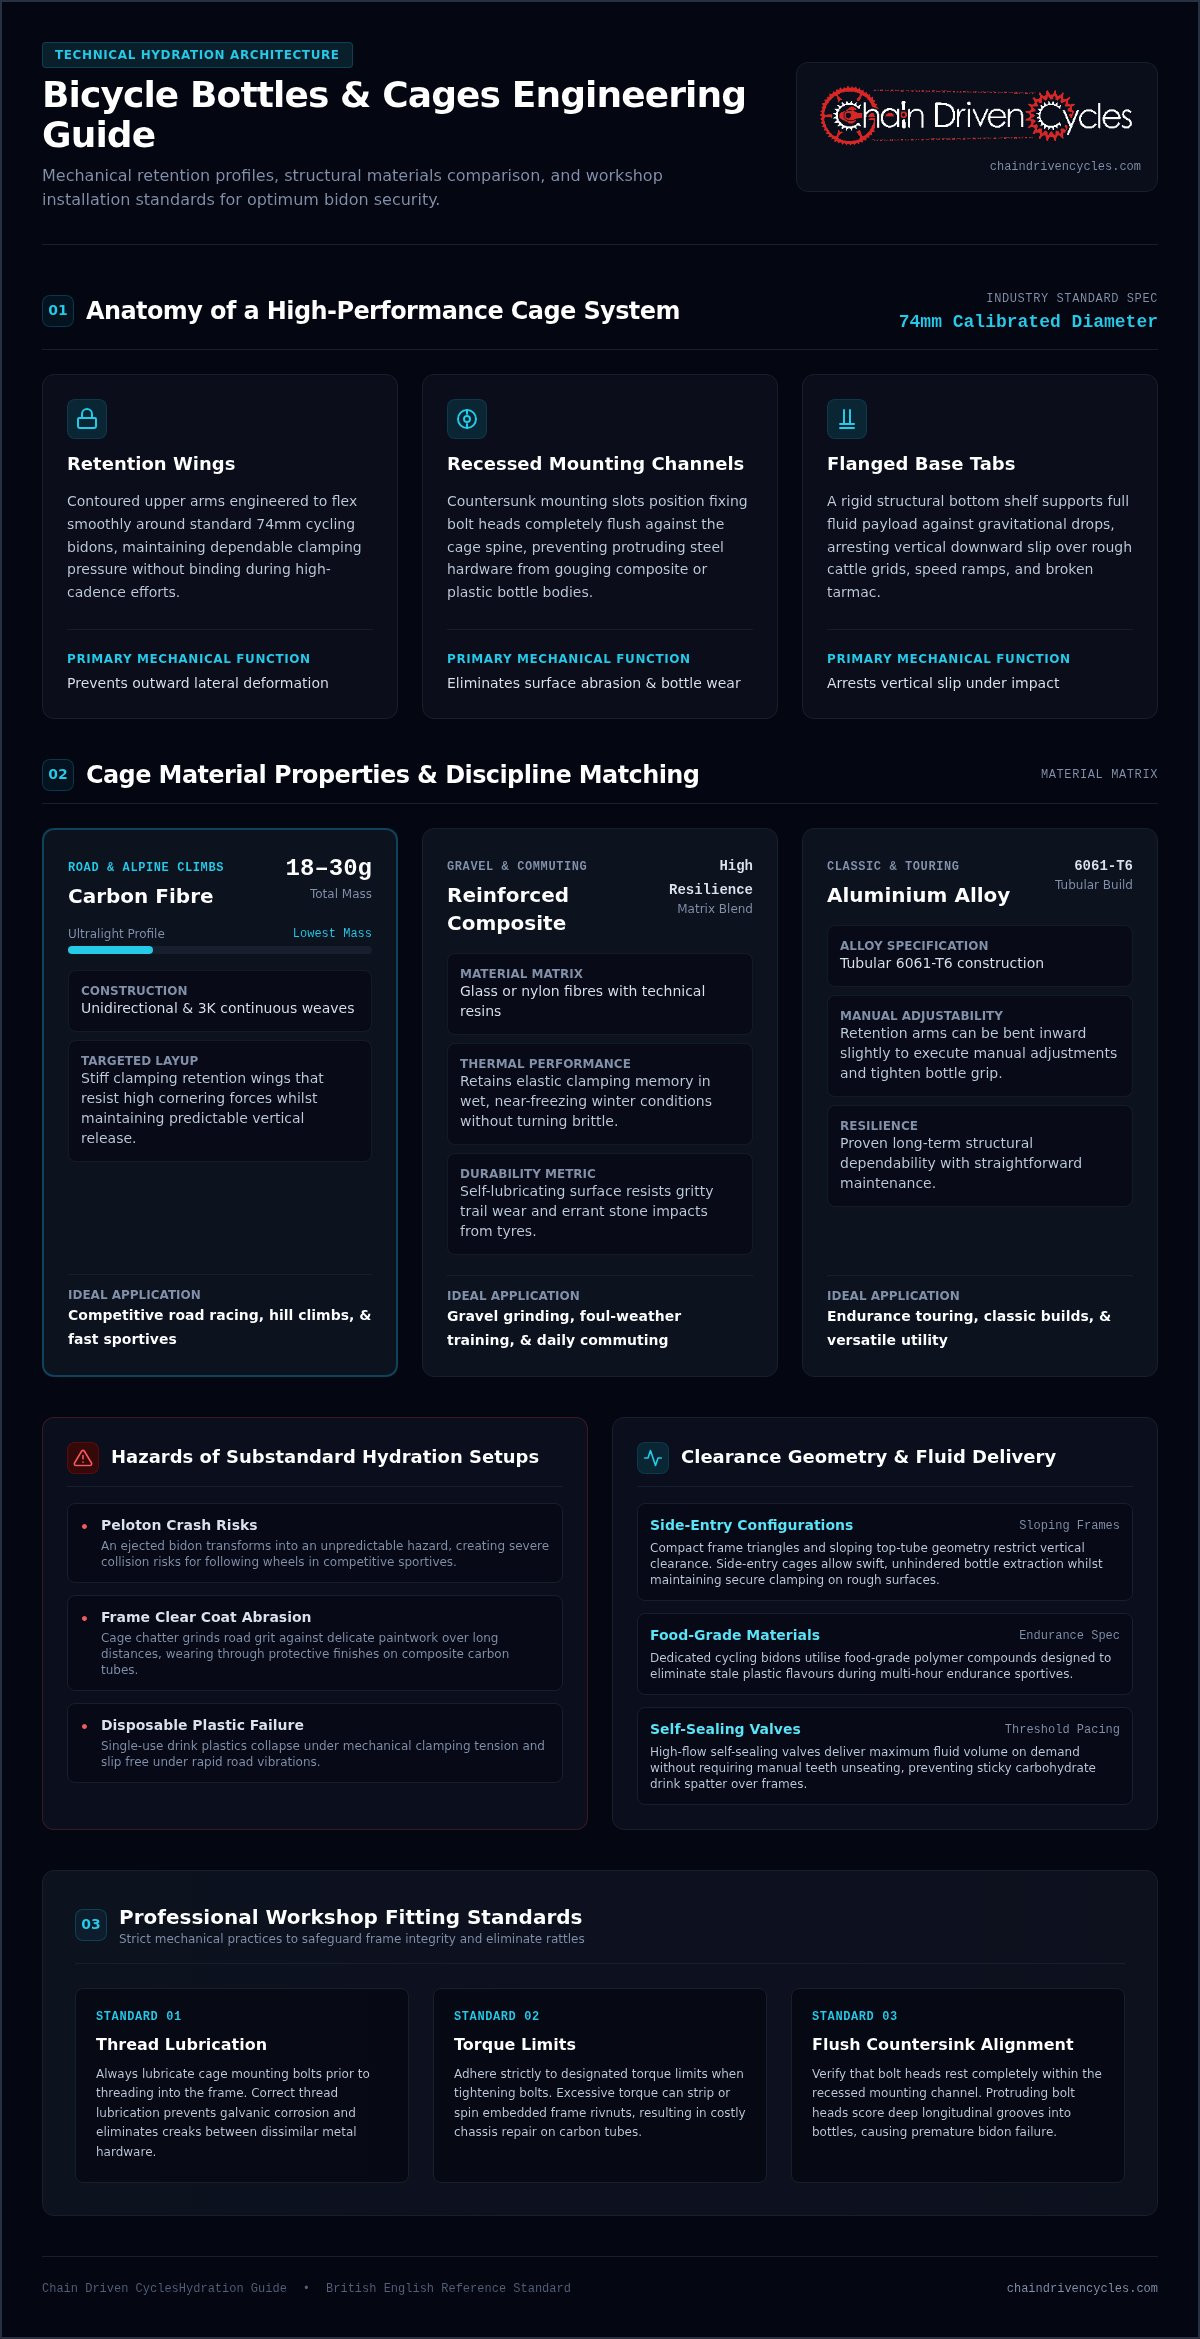
Substandard holders carry immediate consequences in a fast-moving group. An ejected bidon transforms into an unpredictable obstacle, posing severe crash risks for following wheels during competitive sportives. Poorly matched setups also create persistent frame wear. Over long distances, cage chatter grinds road grit against delicate paintwork, wearing through protective clear coats and abrading composite bottle walls until slow leaks develop. Eliminating these rattles keeps your machine quiet and spares you unnecessary distraction when sustaining high power outputs.
Anatomy of a High-Performance Bottle and Cage System
Modern engineering has refined the humble bicycle bottle cage into a finely calibrated component designed around standard cycling dimensions. Purpose-built systems rely on specific architectural elements to ensure security and ease of use:
- Retention wings: Contoured upper arms flex smoothly to grip standard 74mm diameter cycling bidons, maintaining dependable clamping pressure without binding during quick grabs.
- Recessed mounting channels: Countersunk slots position fixing bolt heads flush against the cage spine, preventing protruding steel hardware from gouging plastic bottle bodies.
- Flanged base tabs: A rigid bottom shelf supports the bottle's weight against gravitational drop, arresting vertical slip whenever you hit abrupt road imperfections or speed ramps.
Matching these structural features to your riding discipline guarantees your fluid remains firmly docked until you need it, protecting both your frame finish and the riders sitting on your wheel.
Key Materials Compared: Carbon, Composite, and Alloy Cages
Every frame material and riding discipline interacts differently with hydration hardware. While aesthetic pairing creates a unified build, selecting the right material dictates retention strength, gram count, and long-term chassis protection. Matching your equipment to your typical terrain prevents unwanted bottle dropouts while preserving your bike's finish. You can examine our comprehensive bottles and cages collection to find an exact structural match for your bicycle setup.
Carbon Fibre: The Ultralight Choice for Performance Road Bikes
Carbon fibre cages dominate competitive climbing builds, generally registering between 18 and 30 grams. Unidirectional and 3K continuous weaves allow engineers to orient fibres along primary load paths. This targeted layup yields stiff clamping retention wings that resist outward deformation under high cornering forces, yet flex predictably during swift vertical bottle grabs. These featherweight units complement the sculpted profiles of Italian race machines like Wilier road bikes Ireland riders favour on demanding alpine climbs and weekly fast sportives.
Reinforced Composite: Durability for Gravel and Commuting
Reinforced polymer composites combine glass or nylon fibres with technical resins. This blend produces immense impact resilience against errant stones thrown up by off-road tyres. Composites retain their elastic clamping memory in wet, near-freezing winter conditions across exposed national roads where unreinforced plastics turn brittle. Their self-lubricating surface matrix resists gritty wear, making them an exceptionally hard-wearing choice for gravel grinding, foul-weather training, and daily commuting.
Aluminium Alloy: Classic Resilience and Easy Adjustment
Aluminium alloy cages deliver dependable utility through tubular 6061-T6 construction. Riders can execute subtle manual adjustments, bending the metal retention arms slightly inward to secure thermal flasks or outward to clear wider custom bottles. Hard-anodised coatings shield the metal from corrosive road spray, salty sea air, and acidic carbohydrate mixtures. Alloy remains an enduring, rattle-free favourite on classic steel touring rigs and utilitarian endurance commuters.
Governing bodies continuously highlight the performance toll of dehydration; insights from USA Cycling on hydration monitoring show that even mild fluid deficits compromise power output and cognitive focus. Securing your payload with the correct cage material ensures consistent hydration access whenever you face steep gradients or rough rural lanes. If you are refining your cockpit and chassis ergonomics for the season ahead, consult our specialist technicians at chaindrivencycles.com for guidance on frame fitment and torque specs.
Top-Loading vs Side-Entry Cages: Finding the Ideal Frame Clearance
Modern frame geometry has evolved dramatically. Dropped seatstays, radically sloping top tubes, and rear suspension linkages have significantly compressed the available real estate within the main triangle. While conventional top-loading cages remain the gold standard for open diamond frames, they demand considerable vertical clearance. Pulling a tall 750ml bidon upward often forces the bottle neck straight into the underside of the top tube or against a frame pack. Side-entry cages resolve this geometric squeeze by allowing lateral bottle insertion from either the left or right, maintaining rapid fluid access without frame contact.
When to Select Side-Entry Cages for Compact Geometries
Riders on extra-small or small road frames face acute packaging constraints where a straight upward tug simply is not possible. Side-loading designs are equally critical on contemporary electric hybrid bikes Ireland cyclists rely on for mixed-surface commuting, where enlarged downtubes housing internal battery packs leave minimal central clearance. When setting up these tight spaces, pair a right-handed cage on the down tube with a left-handed cage on the seat tube. This configuration ensures both bidons draw from the identical side of the bicycle, establishing uniform muscle memory during high-tempo efforts.
Maximising Accessibility on Dual-Bottle Road Setups
Organising two fluid payloads across your frame requires a deliberate spatial strategy to preserve bike balance and drinking efficiency:
- Down tube priority: Position your primary hydration bidon here. The lower down tube represents the quickest, most intuitive blind reach while keeping extra mass positioned low near the bottom bracket.
- Seat tube reserve: Reserve the vertical seat tube mount for supplementary plain water or dense carbohydrate mixes intended for later phases of long sportives.
- Slotted backplate adjustment: Opt for cage brackets featuring elongated mounting channels rather than fixed round holes. Standard mounting eyelets sit 64mm apart, but slotted backplates provide up to 10mm of vertical fine-tuning. Dropping the cage lower down the tube unlocks vital clearance for half-frame touring bags and prevents interference with front derailleur clamps.
Carefully evaluating insertion angles across your bottles and cages setup eliminates mid-ride frustration, allowing you to refuel smoothly without breaking cadence or scuffing your frame's internal clear coat.
Choosing the Right Cycling Bottles: Materials, Capacities, and Valves
A premium cage represents only half of your hydration equation. Slipping a cheap, rigid container into a precision holder ruins the riding experience through insecure clamping and foul chemical odours. Modern cycling bidons rely on medical-grade, BPA-free plastics that eliminate unwanted flavours, ensuring pure taste throughout multi-hour endurance rides. Selecting the right bidon requires balancing liquid volume against frame clearance, while modern leakproof valve designs keep sticky carbohydrate solutions off your frame and drivetrain. Select your ideal match from our performance bottles and cages range before your next major training block.
Capacity and Ergonomics: Matching Bottle Size to Route Demands
Fluid volume should reflect route distance and frame size. Compact 500ml to 600ml bidons preserve agile handling, fit easily within tight frame geometry, and save weight during fast-paced road races. When embarking on remote, unsupported loops, high-capacity 750ml or 950ml bottles provide the necessary fluid reserve between sparse service stops. Purpose-built bidons feature deep circumferential neck channels, giving damp or winter-gloved hands a secure grip when extracting bottles at high speed.
Valve Technologies and Taste-Free Plastic Formulations
Stale plastic taste and stubborn mould residue remain frequent frustrations for serious cyclists. Quality bidons use taste-free, food-grade polypropylene compounds with non-stick internal linings that resist lingering smells from acidic electrolyte mixes. For fluid delivery, self-sealing silicone membrane valves represent a significant leap forward; they release a generous fluid stream under light squeeze pressure and seal instantly between sips. Many models include twist-lock caps to prevent leaks while transporting loaded gear bags in the boot of your car.
Seasonal conditions also dictate bottle construction. Dual-wall insulated bidons use internal reflective layers to keep ice drinks chilled during warm summer sportives, whilst preventing fluids from chilling to uncomfortable temperatures on freezing winter training spins. Fine-tuning your liquid payload ensures you stay properly fuelled without missing a pedal stroke. To prepare your bike for upcoming endurance events, shop our cycling collection and equip your cockpit with dependable hydration gear.
Installation, Care, and Setup Tips for Peak Performance
Precision installation preserves your frame and ensures silent, dependable accessory performance across thousands of training kilometres. While mounting hardware appears straightforward, poor technique risks costly damage to carbon tubes and fragile internal hardware. Following professional workshop standards protects your investment and ensures your bidons remain secure over every cattle grid.
Securing Cages Safely to Carbon and Alloy Frames
Frame mounts rely on aluminium threaded inserts, known as rivnuts, set directly into frame walls. Always thread fixing bolts by hand for the first three to four turns to eliminate the danger of cross-threading. Coat bolt threads with a smear of anti-seize compound or quality synthetic grease to halt galvanic corrosion between disparate metals. Use low-profile hex or Torx fasteners paired with nylon washers to spread load pressure across mounting tabs without scratching composite clear coats.
Torque precision matters. Calibrate your wrench to 3 to 4 Nm; over-tightening crushes delicate carbon structures, whereas under-tightening encourages vibrations that back bolts out mid-ride. If you discover a spinning, loose, or stripped insert, consult our professional bike servicing mechanics. We utilise dedicated rivet-nut compression tools to reset mounts securely without risking structural tube integrity.
Hygiene Best Practices for Cycling Bidons
Neglected hydration systems breed dark mould and bacterial film within hidden channels. Rinse and scrub your equipment immediately after returning from long sportives, especially when carrying concentrated carbohydrate or electrolyte powders. Basic cleaning protocols ensure lasting hygiene:
- Nozzle breakdown: Dismantle multi-piece membrane caps entirely, soaking soft silicone valves in warm soapy water to dislodge sugary deposits.
- Airing out: Store cleaned containers uncapped on drying racks in ventilated areas rather than closed dark cupboards, allowing internal surfaces to dry completely.
- Seasonal replacement: Discard worn bidons every season. Road vibration and cage friction eventually score plastic outer walls, thinning the polymer and compromising mechanical cage retention.
Complete Your Hydration Cockpit
Equipping your bicycle with well-matched cockpit gear guarantees seamless refuelling on competitive club runs and solitary centuries alike. We back our curated inventory with extensive mechanical expertise and swift nationwide dispatch across Ireland, ensuring your gear arrives ready for weekend miles. Browse our full range of performance bottles and cages to upgrade your hydration setup today.
Dial In Your Hydration Setup for the Road Ahead
Securing your on-bike fluids is never an afterthought; it is a foundational performance choice. Dialling in your setup comes down to understanding cage retention geometry, accounting for triangle clearance on compact or sloping frames, and adhering to workshop torque standards. When you match flexible, taste-free bidons with resilient holders, you eliminate dropped drinks, distracting frame rattles, and damaged lacquer for good.
As an authorised dealer for world-class European racing bicycles, Chain Driven Cycles curates an extensive collection of 24 proven hydration solutions tailored for modern road, gravel, and endurance machines. Benefit from our specialist mechanical knowledge and dependable nationwide delivery to ensure your bike performs flawlessly across every training split. Upgrade your hydration setup with our curated collection of performance bottles and cages today. Stay fuelled, ride stronger, and keep your focus locked firmly on the road ahead.
Frequently Asked Questions
Are all cycling water bottles and cages a standard universal size?
Most cycling bottles and cages adhere to an industry standard diameter of 74mm, ensuring broad compatibility across major brands. Similarly, the mounting eyelets on bicycle frames use a standard 64mm centre-to-centre bolt spacing. Minor variations in bottle neck indents, wall thicknesses, and cage retention lips still affect retention tightness, which is why testing your specific pairing remains essential before tackling rough, fractured road surfaces.
How do I stop my water bottles rattling or falling out on rough roads?
Start by checking that your bidon's circumferential groove matches the retention tab of your cage. If you ride with metal cages, you can gently bend the aluminium arms inward by hand to increase clamping force. For composite or carbon setups, worn or stretched wings cannot be bent and need replacement. Pairing high-grip composite cages with slightly pliable bottles prevents movement and eliminates noise over broken tarmac.
Can I fit two bottle cages on a compact road bike frame?
Yes, you can fit dual setups on compact geometries by using side-entry cages and staggered bottle heights. Sloping top tubes often obstruct standard top-loading cages, especially along the seat tube. Install a side-loading cage or one with slotted mounting brackets that slide closer to the bottom bracket. Pairing a 750ml bottle on the down tube with a compact 550ml bottle on the seat tube solves tight clearance issues.
What is the primary difference between composite and carbon bottle cages?
The main distinctions are weight, elasticity, and price. Carbon fibre cages offer maximum gram savings, typically weighing between 18 and 30 grams, along with stiff retention ideal for smooth road racing. Reinforced composite cages blend polymers with glass fibre, adding roughly 20 to 30 grams. However, composites offer superior impact resistance against flying gravel, maintain elastic flex in freezing winter temperatures, and cost considerably less.
How do I choose between side-entry and standard top-loading bottle cages?
Base your decision on your frame's internal triangle clearance. Standard top-loading bottles and cages work brilliantly on traditional road frames with plenty of vertical room beneath the top tube. Side-entry models are superior for compact geometries, small frame sizes, full-suspension mountain bikes, or setups featuring half-frame bags. They permit lateral extraction from your preferred hand without clipping frame tubes or catching luggage zips.
What is the best way to clean sports drink residue from cycling bottles?
Strip the bottle cap completely and soak the removable silicone valve assembly in warm water with mild washing-up liquid or bicarbonate of soda. Use a soft bottle brush to scrub internal corners where sugar residues settle, avoiding harsh abrasive pads that scratch the lining. Rinse thoroughly with fresh water and allow every component to air-dry completely while uncapped to prevent mould growth and stubborn chemical odours.
What torque setting should I use when bolting a cage to a carbon frame?
Fasten cage bolts to a torque between 3 and 4 Nm using a calibrated torque wrench. Always apply a thin layer of grease to the threads and wind the bolts in by hand first to avoid cross-threading delicate aluminium rivnuts. Adding nylon washers protects the carbon clear coat from scoring. Never exceed 4 Nm, as excessive compressive force can crush carbon cage tabs or spin internal frame inserts.